
Step 4: Install and configure PHP
This is probably the hardest part of the whole process. Getting PHP working with IIS 6 can sometimes be a challenge. I'll provide a complete look at how to accomplish this feat.
Install PHP
Your first task is to install PHP from the contents of the zip file that you downloaded earlier. I generally install PHP into a folder named C:\PHP5. To do this in your environment:
- Create a folder called PHP5 on your C: drive.
- Unzip the contents of the downloaded file to this location. Windows Server 2003 R2's built-in ZIP file extraction tool works great for this purpose.
Believe it or not, that's the whole "installation" for PHP 5. Now, on to something a little more difficult: configuring PHP.
Configure PHP
There are a few steps that need to be taken to get PHP working under Windows with IIS.
- Add the C:\PHP5 directory to your system's path variable. (Figure M) This way, your system can more easily locate the PHP DLL files it needs.
- Choose Start and right-click My Computer.
- From the shortcut menu, select Properties.
- On the Properties page, select the Advanced tab.
- Click the Environment Variables button.
- From the list of System variables double-click the Path variable.
- To the end of the Path variable, add ";C:\PHP". (without the quotes!)
- Restart your server.
|
Figure M |
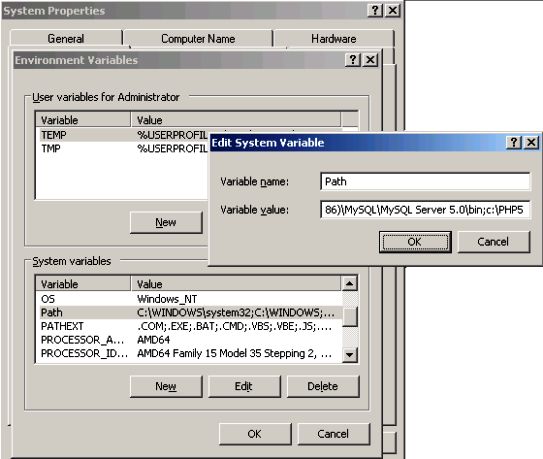 |
| Modify your system path to include the PHP directory. |
- Copy the file C:\PHP5\php.ini-dist to C:\PHP5\php.ini. This is PHP's configuration file. The -dist version is just a sample.
- Now, create a system variable named "PHPRC" and assign to it the path to the php.ini file. If you opt to do this instead of creating a registry entry to achieve the same goal, make sure your PHPRC variable contains only the path to php.ini, and not the path plus the php.ini file name.
- Finally, in order for PHP to work with MySQL, you need to make some changes to the c:\php5\php.ini file.
- Open c:\php5\php.ini using your favorite text editor.
- Locate the extension_dir configuration option and make sure the line reads:
extension_dir = "./ext"
This tells PHP where to find additional modules to load. You need at least one module in order to make use of MySQL with PHP. - Locate the line that reads ";extension=php_mysql.dll" and remove the leading semicolon. In the php.ini file, the semicolon is used to comment out a configuration line. In this case, we want to uncomment the line that loads the PHP MySQL module.
- Directly underneath the preceding line, add: "extension=php_mysqli.dll". This module enables some additional MySQL functionality in newer version of the product.
- From a command prompt, issue the command "iisreset" to reload IIS and PHP with the new configuration file.
Configure IIS to run in 32-bit mode (64-bit Windows only)
The official PHP Windows binaries are not yet available for a 64-bit Windows architecture, but you can still run on 64-bit Windows. However, in order to work, you need to run IIS 6 in 32-bit emulation mode. To do this, from your Windows server, do the following:
- Go to a command prompt.
- From the command prompt window, change to C:\Inetpub\Adminscripts folder. If Windows is installed on a drive other than "C:", use that drive letter instead.
- While in the Adminscripts folder, type the following command:
cscript adsutil.vbs set w3svc/AppPools/Enable32bitAppOnWin64 1
The value "1" for Enable32bitAppOnWin64 tells Windows to run the w3svc in 32-bit mode, while a value of "0" indicates 64-bits. - Type iisreset.
- Reboot the server.
Configure IIS
Even though PHP is configured, before you can start using it, you need to tell IIS how it is able to use the new service. Until you do this, trying to load PHP files into a Web browser from your IIS server will result in nothing but errors.
You can run PHP in one of two ways with IIS – using ISAPI, or as a CGI extension. Since the ISAPI method generally results in better performance, we'll go that route for this article. To get started, you need to add the PHP ISAPI extension to IIS.
- Go to Start | Administrative Tools | Internet Information Services (IIS) Manager.
- Select server name | Web Service Extensions.
- From the right pane, click the "Add a new Web service extension..." option.
- On the resulting screen, in the "Extension name" field, enter "PHP ISAPI".
- Click the Add button.
- Browse to the C:\PHP5\php5isapi.dll file.
- Click OK.
- Check the "Set extension status to Allowed" checkbox. (Figure N)
- Click OK.
|
Figure N |
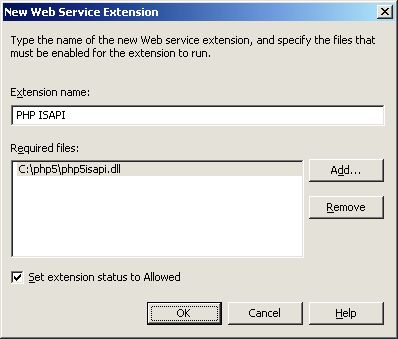 |
| Point the new extension at the php5isapi.dll file in the C:\PHP5 folder. |
Add new extension (.php)
- Go to Start | Administrative Tools | Internet Information Services (IIS) Manager.
- Right-click Web Sites and, from the resulting shortcut menu, choose Properties.
- On the Properties page, choose the Home Directory tab.
- Click the Configuration button.
- Click the Add button.
- On the Add/Edit Application Extension Mapping window, next to the Executable box, click the Browse button and locate C:\PHP5\php5isapi.dll.
- In the Extension field, enter ".php". (Figure O)
- Under the Verbs heading, choose the "Limit to" option and enter "GET,POST,HEAD" into the text box.
- Click OK until you're back at the IIS Manager main window.
|
Figure O |
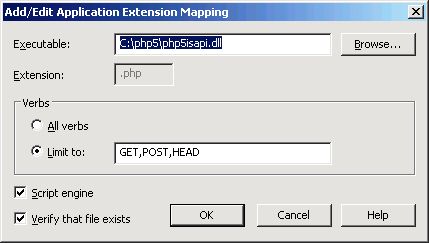 |
| The PHP extension tells IIS how to handle requests for .php pages. |
Also, in IIS, make sure you set the permissions for your site so that you can execute scripts:
- Go to Start | Administrative Tools | Internet Information Services (IIS) Manager.
- Right-click Web Sites and, from the resulting shortcut menu, choose Properties.
- On the Properties page, choose the Home Directory tab.
- In the Application Settings, change the "Execute permissions" option to "Scripts only". (Figure P)
|
Figure P |
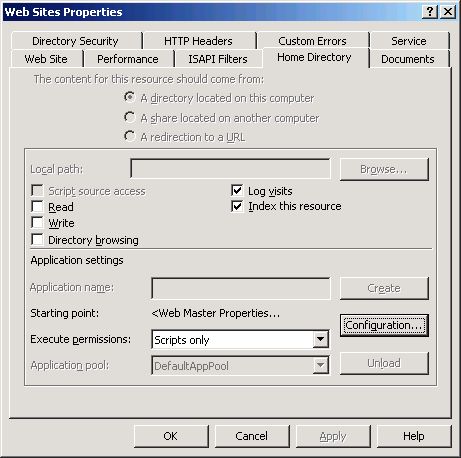 |
| Change the settings in IIS so scripts can run. |
Finally, in IIS, make sure you add a default PHP page, such as index.php. By doing this, you avoid having users need to specify the full path, including the PHP script name to a particular folder on your Web server. Instead, if the user visits a directory and a file named index.php exists, IIS will load it automatically.
- Go to Start | Administrative Tools | Internet Information Services (IIS) Manager.
- Right-click Web Sites and, from the resulting shortcut menu, choose Properties.
- On the Properties page, choose the Documents tab.
- Click the Add button.
- On the Add Content Page screen, type "index.php". (Figure Q)
- Click OK.
- Click OK again. If you get a message about a Child Node also being affected, click OK.
|
Figure Q |
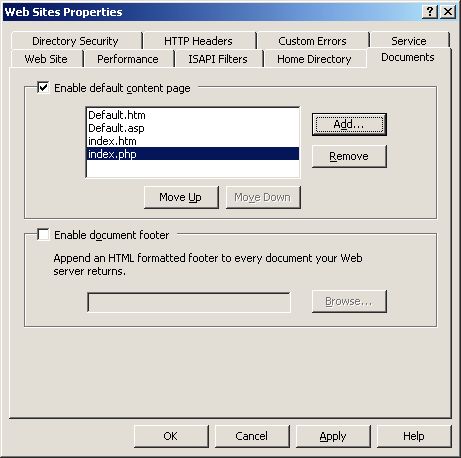 |
| The index page will load if none of the pages above it exist. |
Test PHP
Now, it's time to test PHP to make sure it's able to serve up dynamic pages using IIS.
- In your IIS Web root (normally C:\Inetpub\wwwroot), create a file named phpinfo.php.
- Into this file, paste a single line of text:
<? phpinfo(); ?>
This is actually a complete PHP script and is used to spit out the complete configuration of your PHP-based Web server. - Now, from any machine, visit http://{your server}/phpinfo.php or, from the server, visit http://127.0.0.1/phpinfo.php.
- If you get an error, something is not configured correctly.
- You should get a screen similar to the one shown below. (Figure R)
- Make sure that there is a section in the phpinfo for MySQL. If not, go back and make sure you correctly modified the php.ini file to load the MySQL modules.
|
Figure R |
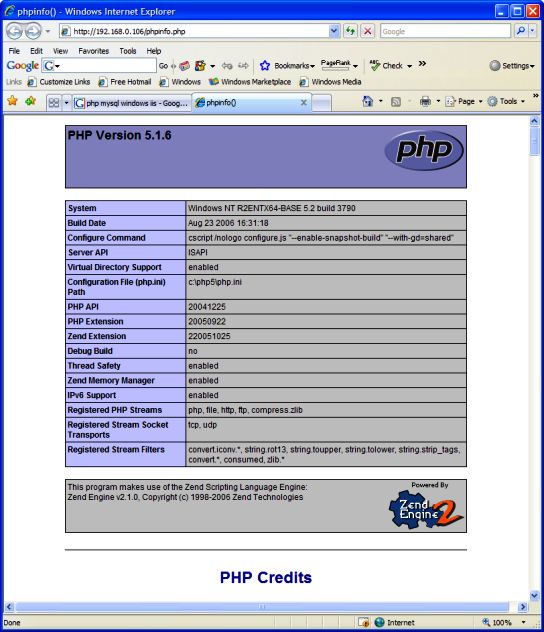 |
| The PHP test page includes a complete PHP configuration overview. |
Step 5: Test MySQL Web connection
To see if the installation was really successful, you need a sample database to test against. For this article, I'll use the MySQL command line tools to create a small sample database whose sole purpose is to make sure the PHP/MySQL connection is working.
To create this sample database:
- You first need to create the actual database. This is accomplished with the following command:
mysqladmin -uroot –p******* create sample
Note: If you get an error here, make sure the password is correct (the –u parameter specifies the user name to use, and the –p parameter is the password you assigned back in the MySQL configuration step). - Now, on to creating the table and adding some data. Again, from the command line, execute the following command:
- C:>mysql -uroot -p******* sample
Replace the "*'s" here with the same password you used before. The remaining steps take place from within the MySQL command shell. - At the MySQL prompt, enter
CREATE TABLE sample_table ( FirstName varchar(30), MiddleName varchar(30), LastName varchar(30) ); mysql> INSERT into sample_table Values ( "Scott", "David", "Lowe") ; mysql> INSERT into sample_table Values ( "Ralph", "John", "Malph") ; - Note: that the semicolons in the preceding steps are very important.
- Using the root user account to access the database from the Web server is a major security risk. As such, you should create a separate user account for this purpose. Type the following command at the MySQL shell:
GRANT ALL ON sample.* to Webuser@localhost identified by 'password'; - Type 'quit' to exit the MySQL shell.
- C:>mysql -uroot -p******* sample
Next, you need a PHP script on your Web server that can read the contents of this new database. If this part is successful, you have a working IIS/PHP/MySQL system!
- In your Web root directory (normally C:\inetpub\wwwroot), create a file named dbtest.php.
- Into this file, paste the following PHP code:
Save this file and then point your Web browser at http://{your server}/dbtest.php. You should get something similar to Figure S below.
| Figure S |
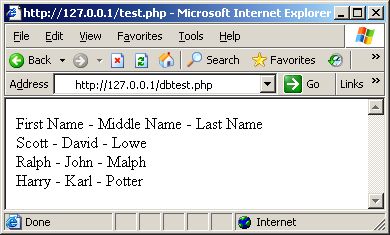 |
| If you see the three names, your configuration is successful. |