Step 3: Install MySQL
The installation process is quite easy, but I'll provide a screen-by-screen look at this process as well as of the configuration process.
MySQL installation
The first screen of the installer is pretty typical, and asks you to choose the type of installation you would like to perform. I'm doing a typical installation, which will install MySQL into C:\Program Files (x86)\MySQL\MySQL Server 5.0. For 32-bit operating systems, the target directory will be C:\Program Files\MySQL\MySQL Server 5.0. (Figure C)
|
Figure C |
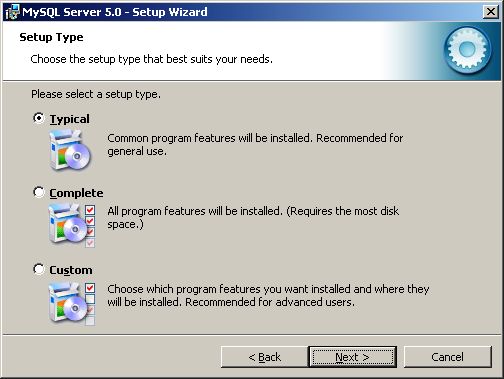 |
| What kind of installation would you like to perform? |
I'm not going to show the summary screen. Believe it or not, for a typical installation, this is it for MySQL! The real work comes next.
MySQL configuration
Immediately following the installation, the MySQL Configuration Wizard starts, which asks you a number of questions about how you plan to use your server? Through your responses, the MySQL Configuration Wizard builds your database server's configuration file, which contains the tuning parameters that let your server do its job.
The first step in the configuration process is to decide how you want to configure your server. Do you want to be asked a bunch of questions pertaining to server use or do you want MySQL to use a canned configuration file that you can then manipulate by hand? I'm going for the Detailed option for this example. (Figure D)
|
Figure D |
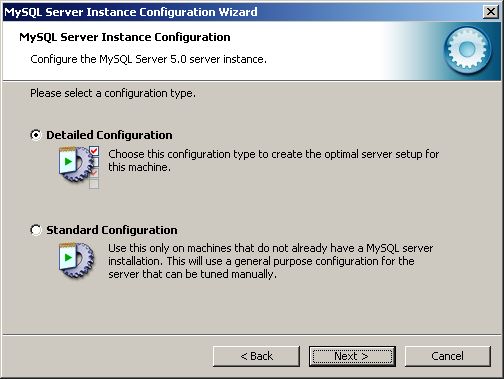 |
| Do you want a detailed analysis or do you want to just use a canned configuration? |
In order to make appropriate decisions about how much RAM and other resources to dedicate to the database function, the MySQL Configuration Wizard asks how you intend to use the server. (Figure E) If you're dedicating the server to nothing but database work, MySQL will use as much RAM and resources as you make available. Since my test server will double as a database and Web server, I'm choosing the Server Machine selection.
|
Figure E |
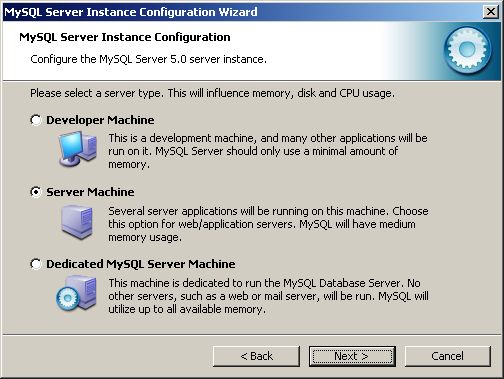 |
| What kind of server are you using? |
Again, the configuration wizard asks another question that helps the tool provide you with the best tuned system for your purposes. For my example, I've opted to use the Multifunctional Database option (Figure F), which is suitable for general use.
|
Figure F |
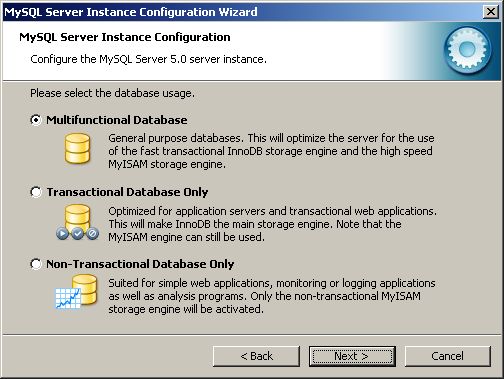 |
| How do you plan to use the database? |
The next stage of the process asks you to define your InnoDB tablespace settings. I have chosen to go with the default settings. (Figure G)
|
Figure G |
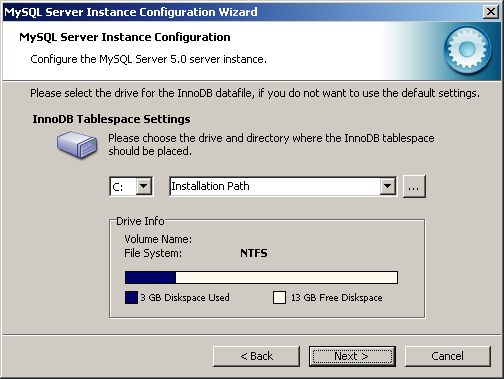 |
| Choose your InnoDB configuration options. |
As you can see in Figure H below, the next step of the process is to determine about how many concurrent connections you will have to your MySQL database. Don't underestimate this number. If you run out of connections, additional users to your site will not be able to access the database. However, don't go too crazy since additional database connections require additional resources. It's a balance.
|
Figure H |
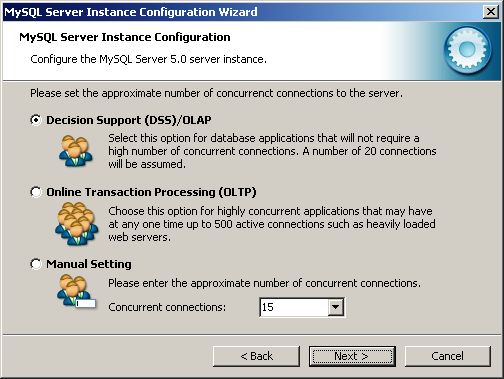 |
| The number of connections to your database is an important resource consideration. |
The MySQL database is generally accessed via TCP/IP. MySQL, by default, uses port 3306 for the communication. You can turn off TCP/IP or change the port number on the configuration page shown in Figure I. Also on this page, you can choose the Enable Strict Mode option, which makes MySQL less forgiving when it comes to minor syntax errors. If you're very, very new to this stuff, I recommend that you disable strict mode while you learn to ease the frustration, but , over time, work to use strict mode since it will reduce the likelihood of bad data making its way into your database.
|
Figure I |
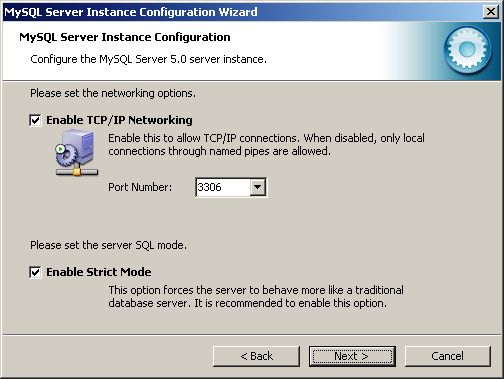 |
| TCP/IP and strict mode configuration settings. |
I'm not going to say much about the next screen. (Figure J) Since I'm using English only, I've selected the Standard Character Set.
|
Figure J |
 |
| Choose your character set option. |
On the next screen of the configuration wizard, you're asked if you want to install MySQL as a Windows service and whether that service should be started when the server boots. Further, decide if you would like the MySQL commands added to your Windows path. For the sake of sanity, I do have the MySQL service starting up with the operating system and have opted to amend the system path. (Figure K)
|
Figure K |
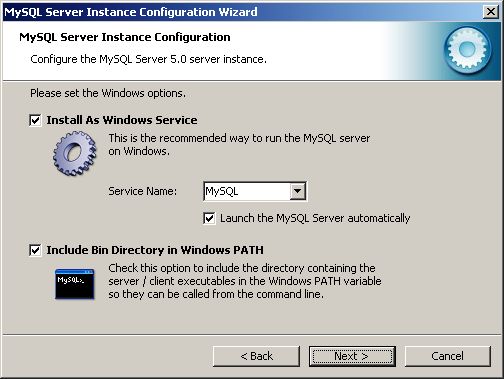 |
| Select environmental options. |
Security of your Web server and database are critical elements. As such, you should assign a strong root password to your database server, not enable remote root access unless absolutely necessary and should not create an anonymous account. (Figure L)
|
Figure L |
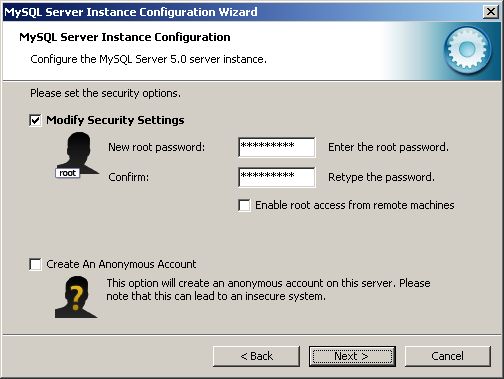 |
| Provide some semblance of security for your database server. |
Security settings are the last configuration item in the wizard. Once complete, the wizard prepares your configuration, writes the configuration to C:\Program Files [{x86)]\MySQL\MySQL Server 5.0\my.ini, and then starts the database service.
You now have a working MySQL database server. Let's move on to PHP.
Windows Server 2003 R2's Setup 4-5(PHP5&MySQL)
Windows Server 2003 R2's Setup 3(Install MySQL)
Windows Server 2003 R2's Setup1-2(Install&Download PHP and MySQL)

- c_mysql-1.jpg (33.2KB)(19)
- d_mysql-config-1.jpg (34.1KB)(19)
- e_mysql-config-2.jpg (45.1KB)(17)
- f_mysql-config-3.jpg (45.6KB)(15)
- g_mysql-config-4.jpg (36.5KB)(18)
- h_mysql-config-5.jpg (44.1KB)(17)
- i_mysql-config-6.jpg (35.7KB)(19)
- j_mysql-config-7.jpg (40.7KB)(18)
- l_mysql-config-8.jpg (37.3KB)(18)
- l_mysql-config-9.jpg (35.0KB)(17)